As an Amazon Associate I earn money from qualifying purchases.

Thursday, December 24, 2020

How to Set Up Network File Sharing on Your Home Windows Network

If you're wondering how to copy files from PCs over the network on Windows, it's not too difficult. I do this for every PC I build, which has been quite a few over the years.

First, you need to know the other PC's network name. You can find this by checking your system information. Opening up the Control Panel, then System and Security, and then System will get you the appropriate page. Far easier: Press Win+X, release both keys, then press Y for System (Win being the Windows key on your keyboard).

You can see the network ID of the PC on the System page under Device Specifications, then Device name. For this particular PC, the network name is "XPS15" (it's an old Dell XPS 15, I'm not that creative with my network names). If you've never specified a name for your PC, it's probably something lame like "Desktop-A8LDK09" or something you'd never remember without looking it up. Go ahead and change that if you want, but you'll need to restart the PC for it to take effect.

You're only half way through accessing PC's storage over your network, sadly. Next, you need to share a folder on the PC. I fly fast and loose and just share the whole damn drive. It's a home network, I don't invite people over and give them the network password unless I trust them, and I also require authentication to access shared folders. You should, too!

So, open Windows Explorer (shortcut: Win+E). Find "This PC" on the left and click that. Then right-click the drive you want to share (ie, C:). Choose Properties, then click the Sharing tab, then click the Advanced Sharing button. Give the share a name (C is default), then press the Permissions button. Select "Everyone" and click the Remove button. Then click the Add button. For the name, type "Authenticated Users" and press the Check Name button. You should now have the share with access permissions set to Read for Authenticated Users. Again, I fly fast and loose so I give Authenticated Users the Full Control option. If your PC has multiple drives, you can do this for each drive you want to share.

You're still not quite done. Your user account needs a password, and you need to know the user account name. You can use the full Microsoft account email address (eg, johndoe@hotmail.com) and password, if your PC is set up with a Microsoft account. Otherwise, open your C:\Users folder to find out the abbreviation for your user name (which you'll need to use for local accounts). You also must have an account password. It can bet a dumb password, but give it something you'll remember that isn't too easy to guess, so not "password" hopefully. "ThisIsMyPassword" should be fine (except it's not now that I've publicly suggested it).

Repeat all of these steps for each PC on your network. Congratulations! You're starting to become an IT professional! (I'm not really joking. This is SysAdmin 101 stuff, but it's very useful!)


Now you're ready to access another PC over the network. Open Windows Explorer (Win+E), and in the address bar (which should say "Quick access" by default), type in the network name of the other PC, but with two backslash characters before the name. So in my case, I type:

\\xps15

Alternatively, on the left side of Explorer, scroll down to Network and click that. Hopefully the other PCs on your network show up, but without the extra step of sharing folders you likely won't be able to see anything on those PCs.

That's it. The first time, you might get a prompt for the user name and password. You can save it if you don't think any hackers or other 'bad' people will get on your PC on your home network, which is a reasonably safe bet. You should now see the "C" folder you shared earlier, which is the entire drive of your other PC. You can even map the folder to a network drive if you want it to always be accessible. Either way, if you browse to the Steam folder (or whatever other folder you want), you can now copy, paste, and delete files.

Simple! Okay, not really that simple, but I do this stuff all the time and it quickly becomes second nature.


How to Transfer Steam Game Downloads Between PCs

Anyone with multiple PCs has probably ended up in a situation where they want to transfer a Steam game from one PC to another. Steam is perhaps the easiest of all digital gaming platforms when it comes to moving games around—better than GoG Galaxy, Ubisoft Connect, and certainly much better (for now at least) than the Epic Games Store. The same process that can be used to move Steam files between two different drives on the same PC extends to copying game files between different PCs.

First, close down Steam on both PCs. Then open the Steamapps folder on the source PC, and the Steamapps folder on the destination PC. By default, this will be:

C:\Program Files (x86)\Steam\Steamapps

If you're like me, it will be C:\Games\Steam\Steamapps, but whatever. You should see a few subfolders, plus some .ACF files. You'll need to copy over both the ACF file for whatever game you want to transfer, plus the actual game files, which are located in the Common subfolder. 


But which ACF file(s) do you need? You'll have to open them up with a text file viewer like Notepad++ (seriously, no one should still be using Notepad!) to figure out which game each file corresponds with. Alternatively, browse to Steampowered.com and search for the game you want to copy. Open the appropriate page and you'll fine the Steam app number in the URL. For example, Cyberpunk 2077 is app number 1091500. Copy the ACF file to the other computer, then go to the Common subfolder and copy the game folder (which can be quite large).

Once the copy is finished, launch Steam on the second PC and it should automatically detect the new game files. You're done! You might need to wait for Steam to sync your cloud saves, but otherwise that's it.

Of course, the above assumes you already know some basic networking stuff. If not, check out my How to Set Up Network File Sharing on Your Home Windows Network guide.

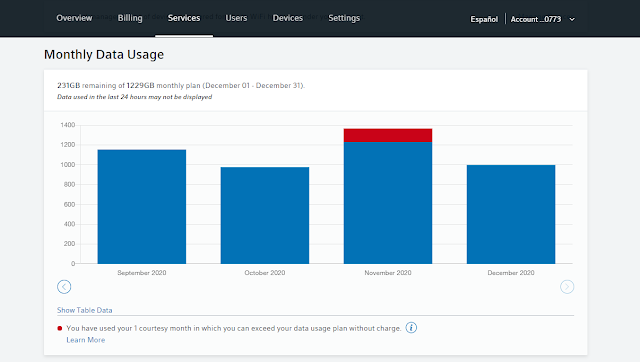
Why wouldn't you just download the game on both PCs, though? Simple: Data caps. They suck, but many of us still deal with them because we have no other alternative. Comcast / Xfinity has a 1229GB per month data cap, which is 205GB more than the unofficial data cap that's been in place for nearly 20 years. My Internet connection (via Comcast the entire time!) has gone from 50Mbps down/6Mbps up to 350Mbps down/12Mbps up over that same time.

Put it this way. Back in 2005, with a 75Mbps connection at the time, it would have required 30.3 hours of continuous downloading at the maximum speed possible to hit my old 1TB data cap. Today? I could chew through my entire monthly 1.2TB limit in just 7.8 hours! Plus, game sizes have massively increased during that same time. 2-5GB games used to be the norm, then 10GB, 15GB, and 20GB. Now, 50-75GB minimum is typical of any major game release, and there are multiple games that weigh in at far more than 100GB. Downloading Cyberpunk 2077 twice would use up 12 percent of my data in less than an hour.

Of course it's not just gaming and downloads. Windows updates, Android and iOS app updates, game updates, and other software updates all take their pound of data. But if you've cut the TV cord and are going full streaming? One hour of 4K content on Netflix or Amazon Prime represents 10-20GB, depending on the encoding quality, and between family members it's easy to use hundreds of GB per month on streaming content. In today's world of streaming video? 2TB is a reasonable data cap, especially considering I already pay $30 extra for a higher bandwidth.

Wednesday, December 23, 2020

How to Transfer Epic Games Store Downloads Between PCs

If you have more than one PC that you use for gaming—like, say, a desktop PC in the office and a laptop for elsewhere—you might want to have the same game installed on both PCs. For some platforms (eg, Steam, GoG Galaxy, Ubisoft Connect) it's as easy as copying the files from one PC to the other, and sometimes importing the already downloaded folder. Epic Games? Not so simple, but at least it's possible—and it's far better than the Microsoft Store, where you have no option other than to download the full game on each PC.

For the Epic Games Store, the process is a bit more painful. First, before you do anything else, make sure the Epic Games Launcher isn't running (on either PC). Next, you need to copy the game files. These are usually located in your Epic Games folder, but can be installed elsewhere. If you've done a custom install to a different folder, you'll need to put the files into the exact same location on the second PC. (Workaround below.) This is why I create a C:\Games folder and have Steam, GOG, Ubisoft, and Epic all installed in subfolders.

This guide assumes you already know some basic Windows networking stuff. If not, check out my How to Set Up Network File Sharing on Your Home Windows Network guide. Alternatively, you could copy all of the files to a (hopefully fast!) USB drive (I have a Samsung T5 1TB SSD [#affiliatelink] that works great). Either way, step one is to copy the files over:

The next step is where things can get tricky. Go to your C:\ProgramData folder (it's hidden by default, so you might need to tell Windows Explorer to show hidden files and folders). You can try to be clever about what you copy, but I find it's easiest to just copy the entire Epic folder from the first PC where you downloaded over to the second PC (and replace any duplicate files that don't have the same time and date).

Once the above is done, launch the Epic Games Launcher on the second PC and it should pick up any games you have on both the second and first PC. There's a catch, however: If you only have a game installed on the second PC, it will disappear and you'll have to jump through extra hoops. Crap. So, your first PC should be a superset of all the games you want on the second PC. But there's another possibility, which is more work and rather a pain in the rear, but it's still better than the complete redownload of a large game.


To execute the workaround, start the download of the game you want on the second PC, pause it, and exit the Epic Games Launcher (say yes to the warning message). On the first PC, of course make sure the game is fully updated, and then exit Epic Games there as well. Now, copy all of the files from the game folder on the first PC, into the game folder subdirectory named:

[Game Folder]\.egstore\bps\Install

Once the copying of all the files is complete, launch the Epic Games Store and resume the download. It should start "verifying" all of the game files. On a fast SSD, this happens at about 400MB per second, so an 80GB game can still take 3-4 minutes to verify. If you're using a slower SSD or a hard drive, it might take 10 minutes or more.

If you see your network traffic start up again, though, the workaround ... didn't work. Sorry. I'm not sure what causes that, but some games don't seem to like doing things this way. Fortnite is a good example, and it probably has difficulties because it gets updated about every other day. As always, your experience may vary, but if neither approach worked for you, leave a comment with the game name and details of what happened.

Why wouldn't you just download the game on both PCs, though? Simple: Data caps. They suck, but many of us still deal with them because we have no other alternative. Comcast / Xfinity has a 1229GB per month data cap, which is 205GB more than the unofficial data cap that's been in place for nearly 20 years. My Internet connection (via Comcast the entire time!) has gone from 50Mbps down/6Mbps up to 350Mbps down/12Mbps up over that same time.

Xfinity, your data caps SUCK!

Put it this way. Back in 2005, with a 75Mbps connection at the time, it would have required 30.3 hours of continuous downloading at the maximum speed possible to hit my data cap. Today? I could chew through my entire monthly limit in just 7.8 hours! Plus, game sizes have massively increased during that same time. 2-5GB games used to be the norm, then 10GB, 15GB, and 20GB. Now, 50-75GB minimum is typical of any major game release, and there are multiple games that weigh in at far more than 100GB. Downloading Cyberpunk 2077 twice would use up 12 percent of my data in less than an hour.

Of course it's not just gaming and downloads. Windows updates, Android and iOS app updates, game updates, and other software updates all take their pound of data. But if you've cut the TV cord and are going full streaming? One hour of 4K content on Netflix or Amazon Prime represents 10-20GB, depending on the encoding quality, and between family members it's easy to use hundreds of GB per month on streaming content. In today's world of streaming video? 2TB is a reasonable data cap, especially considering I already pay $30 extra for a higher bandwidth.

Friday, November 27, 2020

Black Friday Gaming PC 2020? Not this year!

 I like to do a special Black Friday Gaming PC build every year, but this year, component prices are completely fubar. Ryzen 9 5900X? Can't find it in stock anywhere but eBay at massively inflated prices! The same goes for the rest of AMD's Zen 3 CPU line. And don't even get me started on graphics cards.

RTX 3070RTX 3080, and even the exorbitantly priced RTX 3090? All are sold out and will likely remain in limited supply / high demand until at least February 2021. Our savior AMD, with its Radeon RX 6800 XT and Radeon RX 6800, is actually even worse. That's because AMD is trying to procure next-gen PlayStation 5 and Xbox Series X/S console processors, plus Zen 3 CPUs, plus RDNA2 GPUs, all from TSMC using its 7nm node. Meanwhile, TSMC has customers lining up, including Apple, Nvidia (GA100), and maybe even Intel!

It goes deeper than that. The die size for one of the CPU compute dies in a Ryzen 5000 series processor is 80mm2. The die size of the Navi 21 GPU in RX 6800 series is 519mm2. So, AMD can get one GPU or about 6.5 CPU compute dies from the same wafer area. The GPU needs memory, cooling, a PCB, and more. The CPU just needs a package and some resistors and capacitors. Basically, a single RX 6800 series graphics card costs about 10X as much as a single Ryzen 7 5800X to produce. With high demand for both, AMD will make far more money by producing CPUs.

COVID-19-fueled shortages and increased prices apply to many other PC components as well. Last year I found a 550W 80 Plus Gold power supply for $67. This year, the cheapest high quality 550W PSU is about $95.

There are a few components that you can find at reasonable prices, at least. Good quality motherboards for both Z490 chipset (Intel) and X570 chipset (AMD) start at around $150-$160. You can also pick up 2x8GB DDR4-3200 memory for $50, or 2x16GB DDR4-3200 memory for $95. That's way cheaper than last year. SSD prices are also down, with 1TB M.2 drives starting at $95. There are plenty of viable PC cases, like the Corsair Carbide 275R Airflow for $65.

But without a decent price on a CPU or graphics card, it's going to be hard to build a good new PC. Even previous generation GPUs like the RTX 2060 Super and RX 5700 XT now cost over $50 more than they did just a few months back, and there are better GPUs enticing us. My advice: Save your pennies and buy something else.

And Happy Thanksgiving!

Saturday, October 10, 2020

RobotCache Review

There are scamcoins, and then there are coins that are basically a scam. RobotCache and it's Iron (IRON) coins fall firmly in the latter camp. They appear to be legit, but the value is a complete joke. It doesn't matter how much hardware you throw at the problem: you're going to get ripped off. I've run a few tests, though, so let's just cut straight to the chase.

The big claim of RobotCache is that you can buy games with no exclusives, and that you can earn 'free' stuff. And by stuff, we're talking about games. If you enable mining in the client, your PC will happily donate spare compute cycles for both your GPU and CPU to the mining of Iron. It's basically like Ethereum, except not actually worth anything.

I just ran a test on a GeForce RTX 3090 card (#AffiliateLink) the world's fastest GPU. It does about 100MH/s, which is a lot — about twice the speed of an RX 5700 XT. However, it also consumes a lot of power, like very close to 350W. If you were mining Ethereum, that works out to around $2.75 per day in income, minus power costs. For someone that pays $0.10 per kWh, that's $0.84 per day in power, so a net income of $1.90.

That's not great, considering the GPU costs $1,500, as it would take two full years of 24/7 mining just to break even. But compared to RobotCache? It's a damn bargain! See, RobotCache pays you in Iron, and with the RTX 3090 the estimated Iron per day is a whopping 21.3. The value of said Iron is $1.00 per 100 Iron, so instead of making $1.90 in Ethereum, you instead earn $0.213 in Iron. And that's before you have to account for power costs.

Bottom line: RobotCache is hoping to prey on innocent victims. I can just imagine some young gamer using his home PC and leaving it mining while idle. Even with an extreme GPU and CPU, it would take over two months to earn enough Iron to purchase a full priced game. Right now for example, RobotCache estimates 119 days of mining to earn enough Iron to purchase Wasteland 3. So, after four months of mining, and a cost of $130 or so in power, you'd earn a $60 game.

Except, the math is wrong. Yes, you read the correctly: RobotCache is lying on the math! Because the "~119 days" isn't based on your actual PC hardware. I don't know where they pulled that number from. (Actually, I do: it's from "Current Wallet Balance and Avg User Earnings" — suggesting there are a hell of a lot of gullible users of this software!) The reality is with a 3090 you'd actually earn 22 Iron per day (being generous and rounding up), and you need 5999 Iron to buy Wasteland 3. That means it would actually take 273 days, and a cost of about $0.85 per day. Your 'free' game thus ends up costing over $230.

Or maybe not? I still don't know where the Iron per day estimate comes from, but it's all over the place. Just watching while I wrote this post, I've seen it as low as ~12 Iron per day and as high as ~110 Iron per day. The screenshot after about 45 minutes of mining shows an estimate of 65 Iron per day. That's almost enough to break even prospect on power cost vs. game cost. But it's also one fourth what you'd make from mining Ethereum.

Also, just a parting thought: Consumer GPUs aren't really designed for 24/7 operation at 100% load. I've done it in the past, and I've killed off a lot of graphics cards. Some cards only lasted about six months before the fans failed, while others would last about two years. Neither one represents a good return on investment, unless you get the hardware for free and get free (or very cheap) power to run it.

Thursday, May 28, 2020

Intel die sizes: Coffee Lake, Comet Lake, and Ice Lake

Intel, for whatever reason, has seen fit to stop publishing die sizes and transistor counts (estimates) on it's latest CPUs. It's a strange move, probably driven by the company's difficulties with getting high-end 10nm parts out the door. Sure, Ice Lake now exists and is readily available, but 10nm was at least three years late. But I digress.

I really just wanted to gather all the die size information I had into one place, for ease of reference. Transistor counts could be estimated, but the density varies depending on what sort of logic is in use (cache, branch predictor, etc.) so I'm not going to even try. But here are the current die sizes, based on physical chip measurements (which are accurate to within probably 2%):


These first three come courtesy of der8auer, who routinely delids CPUs. (Links to Amazon earn me affiliate commissions.)

Core i7-8700K die size: 9.2 x 16.7 mm ~= 153.6 mm2
Core i9-9900K die size: 9.2 x 19.6 mm ~= 180.3 mm2
Core i9-10900K die size: 9.2 x 22.4 mm ~= 206.1 mm2


What about Ice Lake? As with recent Intel U-series processors, the package has two chips. The smaller is the platform controller hub (PCH) while the larger represents the main Ice Lake CPU. I've seen earlier estimates based on the Ice Lake wafer that the die size was around 130 mm2. However, using the package shots it's actually smaller than that.

Ice Lake / Core i7-1065G7 die size: 11.40 x 10.78 mm ~= 122.9 mm2
Ice Lake PCH die size: 5.74 x 9.42 mm ~= 54.1 mm2

Intel does have plans to release server variants of Ice Lake, which presumably means yields are good enough that it can actually manufacture larger chips. But how big would such a chip be?

The current 123 mm2 Ice Lake chips have a rather large GPU cluster that wouldn't be needed for servers. In fact, the 4-core CPU cluster only occupies about a quarter of the entire die space right now, with other portions used for the DDR4 memory controller, system agent, and GPU.

To be more precise, the CPU cores and ring bus use about 26.5% of the die area. The Gen11 graphics is about one third (33.6%) of the die space, the DDR4 controller is only 6.3% of the die, and the system agent makes up the remaining 33.6% of the die.

So if Intel wanted to make, for example, a 32-core Ice Lake server part using the same size Sunny Cove cores, with an 8-channel memory interface, it wouldn't even need to be that big of a chip. Oh, it would be much larger than the current Ice Lake-U CPU+GPU's 123 mm2, but as a rough estimate, Intel could do 32-core Ice Lake with a die size of about 375 mm2. Piece of cake! And only two years late compared to the competition.

Friday, May 1, 2020

Intel Skylake-X and Cascade Lake-X Die Sizes

I'm going to keep this fairly simple, but I figure if I couldn't easily find this information, others are probably looking for it as well. Basically, Intel never gave out information on the die size of it's Skylake-X and later Cascade Lake-X CPUs. The best way to get a reasonable estimate of die size is from shots where extreme overclockers and enthusiasts have delidded the chips. I've gathered what I could find out there to come up with the following data.

There are three variants of Skylake-X (SKL-X) and Cascade Lake-X (CSL-X). While CSL-X chips do have some minor changes to the underlying design (like hardware mitigations of some side-channel attacks), fundamentally not much has changed. So the following should apply to all chips of each family.

The LCC (Low Core Count) variety of Skylake-X has up to 10 cores. This is the die used in Core i9-7900X, Core i9-9900X, and Core i9-10900X. It's also used in the Core i7-7800X, Core i7-7820X, Core i7-9800X, and Core i9-9820X.

HCC (High Core Count) Skylake-X CPUs have anywhere from 12 to 18 cores. These chips (not counting Xeon models) consist of the Core i9-7920X, Core i9-7940X, Core i9-7960X, Core i9-7980XE, Core i9-9920X, Core i9-9940X, Core i9-9960X, and Core i9-9980XE from the Skylake-X family, and the Core i9-10920X, Core i9-10940X, and Core i9-10980XE from the Cascade Lake-X family.

Finally, the XCC (Extreme Core Count) models have 20 to 28 cores. These are used exclusively in Xeon chips -- they're not intended for enthusiasts. Of course there is the Xeon W-3175X "enthusiast" chip that has the full 28 cores, but at $3,000 I'm pretty sure no one bought it for gaming purposes.

But the question I had is: what are the actual die sizes of these various chips? So I did some sleuthing and came up with the following.

First, GamersNexus has some nice shots of a delidded Core i9-7900X next to a ruler. The measurements show a size of approximately 24.5 x 14 mm, giving a final die size of 343mm square. That's the easy one and you can find quite a few other places with pictures and estimates of die size. It's probably accurate to within 1-2%, which is fine since transistor counts are probably estimated in a similar fashion.

Skylake-X LCC Die Size: ~343 mm square

Stepping up to the HCC chip, not many people delidded that one. I found this thread on Overclockers where user batboy delidded his Core i9-7920X, and der8auer also delidded an i9-7920X. We do know the package size for all the Skylake-X chips (it's officially 52.5 x 45 mm, which is accurate to within ~0.25mm I assume). Using that and the delidded images, I estimated die size.

The der8auer image is better for this, and gives a package width of 684 pixels and a die width of 344 pixels, with a package height of 787 pixels and a chip height of 329 pixels. Using simple math, that works out to a die size of about 22.6 x 21.9 mm, or 495 mm square (plus or minus 5 mm square).

Skylake-X HCC Die Size: ~495 mm square

Finally, the Skylake-X XCC die is a bit harder to find, but der8auer comes through again with a video where he delidded and overclocked the $3000 W-3175X. Not that he paid for the chip, but still. Anyway, I've grabbed a shot after the delidding, adjusted the angles a bit to make it easier, and used information on the LGA3647 package size to arrive at the actual die size.

The image shows a width of 763 pixels for the package and 216 for the die width, with a package height of 538 pixels and a die height of 302 pixels. Crunching the numbers, that gives a final die size of approximately 21.7 x 31.7 mm.

Skylake-X XCC Die Size: ~688 mm square

Obviously there's still a bit of wiggle room, but the above is about as good of an estimate as I can provide. Equally obvious: Skylake-X is a big CPU in its LCC incarnation, and even bigger at HCC. Around 500mm square in size is one of the larger CPUs Intel has made. And of course, it can't hold a candle to the XCC die size of nearly 700mm square.

My real question: Just how big will Intel's Xe Graphics HPC variant be? That wafer shot from Raja, along with some of the things IntelGraphics has tweeted, suggests it will be the biggest chip Intel has ever made. And yes, it's going to be very expensive -- even more than Xeon XCC CPUs I'd wager.

Saturday, February 1, 2020

Journey to the Savage Planet - all Kindex scans

So, this isn't my usual thing, but I got going and decided I'd try to hit 100 percent on Journey to the Savage Planet so I can retire it properly. You need to scan a bunch of stuff, find all sort of 'hidden' things, etc. You can get upgrades that will eventually make it easier to find the alien tablets and videos, yellow globs, and alien alloys. The one thing you'll just have to sort of do as you go is scan things. Here's the complete list of all the stuff you can scan, then, in alphabetical order:

ALIEN TECH:
Alien Pumpjack
Alien Teleportation Pedestal
Cracked Stone Grate
Crystalline Beacon
Enigmatic Tabliet
Genetic Samples
Leaping Alien Petroglyph
Mysterious Shrine
Ornate Alien Chest
Planet Seed
Rotating Mechanism
Strange Alien Barrier
Strange Alien Statue
Unknown Explorer's Log

CREATURES:
PREY
Baboushka (Demi)
Baboushka (Quarter)
Baboushka
Burglesnatch (Balmy)
Burglesnatch (Tundra)
Imperial Scarab
Maroon
Mesmertoxin
Osmotic Cube
Pufferbird (Alpha)
Pufferbird (Cave)
Pufferbird (Snowy)
Pufferbird (Valley)
Skipper (Royal)
Skipper (Scotch)
Skipper (Tortoiseshell)

PREDATOR
Barfer
Boomerbang (Feral)
Boomerbang (Hermit)
Cragclaw 
Floopsnoot
Floopsnoot Matriarch
Infected Pufferbird
Insectoid Swarm
Jellywaft (Inferior)
Jellywaft (Prime)
Kapyena (Battle)
Kapyena (Widow)
Meat Vortex
Pikemander (Desert)
Pikemander (Marbled)
Porcupod
Schnozo
Slamphibian (Grizzled)
Slamphibian (Health)
Sproutlook
Teratomo

FLORA:
Aluminum Vein
Amber Armor
Bellowbulb
Big Ol' Nut
Blight Bomb Plant (Baby)
Blight Bomb Plant (Teen)
Blight Bomb Plant
Bombegranate Plant (Baby)
Bombegranate Plant (Teen)
Bombegranate Plant
Bombodoro
Breezee
Bright Blossom
Bulwark Bush
Burgle Haven
Cacnut
Canopy Leaf
Carbon Vein
Citrasweet
Combativore
Crackle Cap
Dripping Orifice
Feeblecap
Floatshroom
Fragile Crystal
Fungissimo
Giant Bombegranate Plant
Glow Shrub
Gossamer Wood
Grapple Flower
Grapple Rail
Grotesque Opening
Jellywaft Pit
Large Ant Mound
Larval Jelly
Mallowsap
Massive Skull
Metallic Seed Bag
Polypod Tree
Puffer Spring
Pufferbird Burial Ground
Pufferbird Nest
Pus Launcher
Salt Crystal
Schnozo Hole
Shock Fruit Plant (Baby)
Shock Fruit Plant (Teen)
Shock Fruit Plant
Silicon Vein
Smoke Spout
Space Lettuce
Splinter Timber
Springy Egg Sac
Stinkshroom
Stone Armor
Succulescent
Swarm Hive
Swarm Hive Shield
Tentareeds
Tentaweeds
Vaultivore
Vitality Plant
Witherwood

KINTECH:
3D Matter Reconstructor
Advanced Proton Tether
Binding Bile
Bio-Replication Chamber
Blight Bomb
Bombegranate
Cartographer Deployment Hatch
EKO
Grapple Seed
GROB
Javelin Teleportation Field
Javelin
Jump Thrusters
Kindred Aerospace
Kindred Computer
Launch Boosters
Martin Tweed
Meat Buddy Deluxe
Nomad Pistol
Proton Tether
Resources Backup Storage
Shock Fruit
Springy Seed
Stomp Boosters
Tactical GROB
The Cartographers
Your Sad Lifeless Body

POINTS OF INTEREST:
Ancient Effigy
Crashed Meteor
Gigashrooms
Repulsive Tree
Runic Alien Bricks
Shattered Pod
Towering Statue

I'll leave off the AR-Y 26 stuff (it's 41 locations you visit over the course of the game) and resources, as those ought to be hard to miss. The only stuff I missed initially was scanning the Burglesnatches (hint: kill something outside the lair so it will appear, then use the binding bile on it to hold it still). Also, I didn't scan the smallest split on the Baboushka (the 'Quarter'), missed the Shattered Pod, and forgot to scan my backup storage (when you die). Hope this helps someone! Worth checking out this video of all scanned flora and creatures if you need more details (the time codes are in a 'spoiler' tag below the video, but the text isn't sorted in any meaningful way).